
Beading Tutorial #1
The Earrings (colors may vary)

Before we get started there are a few things you will need to to make this an enjoyable experience.
Number one, Make sure you are in a well lit room, that you have a comfortable seat and a good table height. You will want to make sure that you are able to sit upright for your beadwork. Slouching will become hard on your back otherwise.
Number two, you will want to make sure that you have a good open working space. You want to be able to move your arms freely in your space as to avoid knocking over anything that may be in your surroundings, such as a coffee cup, phone, or even your tablet/laptop. You also want to make sure your threads don't get caught on anything either, such as your bead tubes or other materials on your beading board.
And number three, you will want to give yourself breaks. Sometimes we get caught up in our projects and tend to bead for long periods of time. It is important to give your eyes and hands a rest every so often and even get up, walk around and do another activity for a while before returning to your project. Hand stretching is also essential when working for long periods of time.
Okay, now we are ready to review our materials, (contents may vary):

1. Seed Beads
These are size 10/0 Preciosa seed beads. Seed beads range in sizes, colors and finishes. There are many different brands of seed beads on the market which in turn means many different levels of quality. These glass seed beads are Preciosa Czech seed beads and are of higher quality, perfect for beginners.
2. Bugle Beads 30mm
These long tubular beads are what we are going to use in our fringe. These beads are made of glass also, but these are "cut" beads which means that they may have sharp edges. When working with these beads it is important to take these edges into account. Tension is very important, but we will get back to that.
3. Bugle Beads size #3
These are short tubular beads. Much like the long bugle beads, these are also made of glass and may have sharp edges. We will be using these in our ladder stitch which is the middle portion of our earring. These beads also require a great deal of attention.
4. Thread
The thread that we are using is a nylon beading thread. This thread can come in many sizes, strengths and colors. Today we are using a very standard nylon thread called Good Thread by John Bead. This particular thread is great for beginners as you can use it for a variety of beading techniques.
5. Beading Needles
Our needles are #13 Japanese quality steel beading needles. I chose the longer needles for these kits as they grab more beads when working on your fringe. Our size 13's fit nicely into our size 10/0 beads as they are thin and can pass through the beads multiple times, perfect for our fringe earrings! I put two needles in each kit as sometimes they bend or even break!
***Sometimes when we're beading our materials get a little tight and it might be tempting to use your teeth to pull at your needles. Do not do this as you risk chipping your teeth. Always use needle nose pliers if your needle gets stuck at any time!
6. Earring hooks
As with everything else, our earring hooks come in many varieties: colors, styles and finishes etc.. For our kits we have kidney-wire hooks. These do not have an opening so they do not require extra tools to use.
7. Beading Mat
I added the beading mats to the kits to make our beading experience a little easier. I personally didn't use beading mats at the beginning of my journey but as soon as I was introduced to them, they became a must-have in my beading projects. These are handy little flat mats with a fuzzy textured surface. This prevents your beading from rolling off the surface you are working on. You can place them on the table in front of you, or tape them to a small plate. I used to tape mine to a soap dish as it was easier to pick up. Pour a little bit of beads on them at a time. This also is great as you are not loading yourself up with beads, which prevents a bead soup from happening at the end of your project.
Ok, we are ready to get started!!!!
Step one: Ladder Stitch
You will need two arm lengths of thread. One arm length is measured by holding the thread between your index finger and thumb and pulling the thread the length of your arm to your shoulder. (about 25-30 inches)
Two arm lengths is enough for this entire earring without having to replace the thread.

Thread your needle, make sure you leave a 4 inch tail (excess thread) but do not knot your thread. You will use the tail later on in the earring.

Pick up your first two bugle beads. You will then slide your beads all the way to the other end of your working thread. You will need to leave a tail here too so bring your bugles about 4-5 inches away from the end of the thread and lay on the beading mat in front of you.

You will then thread your needle into your first bugle coming in from the short end of the thread.

Pull the needle all the way through the first bugle coming in from the short end of the thread. you will pull the thread all the way through, creating a loop and then tighten the beads together so that they are sitting next to each other.


You will then go back into your second bugle.

And pull all the way through.

Now you are ready for your third bugle or "rung." Pick up your third bugle bead and slide it down to your first two beads.

You will then go back into your previous bead from the 'top' and pull through.


and then again, go back into your third bead from the 'bottom'

and pull through until it looks like this:

continue with this technique until you reach seven beads across, the end result looking like this:
Step 2: Brick-Stitch
Pick up one bead, either color, and slide the bead all the way to the 'top' of your ladder stitch


Then you will slide your needle under the thread between the last two bugle beads of your ladder stitch

pull all the way through until your bead is sitting sideways on top of your ladder stitch

now you will insert your needle into the bead from left to right

pull all the way through and your bead will sit on top of your ladder stitch

you are ready for your next bead. Pick up another seed bead and repeat the technique for the first bead.

you'll notice the second bead and following beads will sit a on your ladder stitch a little more nicely which makes inserting your needle a little easier.


continue this technique until you have your 6 seed beads sitting on top of your 7 bugle beads in your ladder stitch.

now you will flip your beadwork so that the threads are on the right side

You are ready for your second row, when you reach your second bead you can switch colors if you want to follow the same pattern. Otherwise continue with whatever pattern you like

Continue beading until you get to your fifth row of brick-stitch )this will be the top row with only two beads) flipping your beadwork as you reach the ends each time. This makes it easier to bead as you are always working from right to left.

you are ready for your earring hook
Take 4 beads and slide them down your thread to the top of your beadwork

insert your needle into the bead next to the one you're sitting on

pull all the way through until it looks like this

continue threading through each bead on the edge of your beadwork ONE bead at a time! It is tempting to try to go through all of these beads at once but that usually results in bent or broken needles, or even shattered beads.


when you reach the end, go through the bugle too so that you are coming out of the 'bottom' of your ladder stitch

You are ready for fringe!
Lets start with a couple notes:
- when we are working with fringe, tension is KEY to achieve a good hanging fringe. Too tight and your fringe will buckle and warp. Too loose and you will have a visible gap between your fringe and ladder stitch but we want just a slight gap so our fringe hangs nicely. I suggest leaving about half a millimeter gap between the fringe and ladder.
- the long glass bugles are 'cut' beads so we will be using what I call a 'protection' bead. This will create a sort of barrier between the cut edge of the bead and the thread inside the fringe
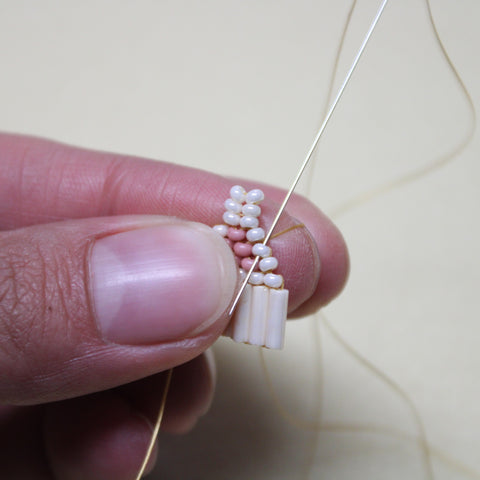
Add your beads following the bead pattern and slide them up to the bottom of your brick stitch. For the first fringe I have 4 seed beads, then 1 long bugle bead, then 6 'turning beads'

separate your top turning bead from the rest of the beads leaving it close to the bugle.

Insert your needle through that top 'protection' bead, and continue into the bugle, up the rest of the beads and into your small bugle poking out the top if it.

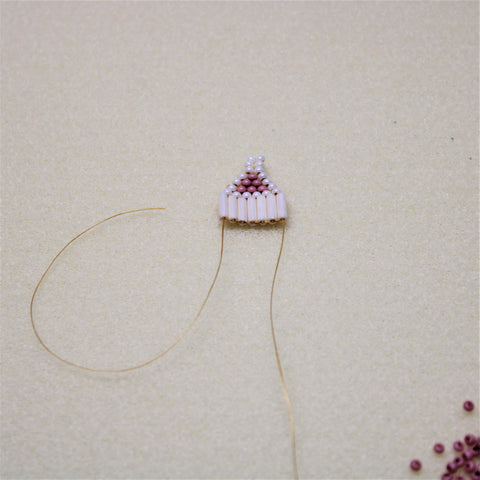
pull all the way through making sure the tension in your fringe is good.

additionally to create a nice fringe you can hold the bottom turn-bead using the tip of your fingernail and pull the thread tighter from the top. Again, we don't want to go too tight or too loose, just the Goldilocks of tension!

Now you are ready for your second fringe. Insert your needle into the top of the bugle beside the one you just completed, pull through and then follow the pattern for the next fringe.

the second fringe is a bit longer so you will need to pop out halfway through our fringe, pull the thread through and then thread through the rest of the fringe coming out the top of the ladder stitch, and again then pull through
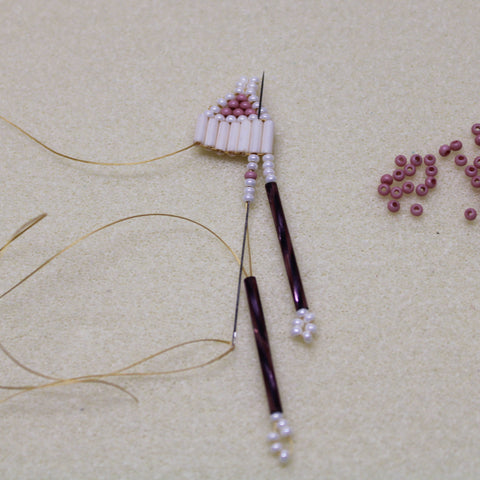
make sure your tension is good before moving on to the next fringe.
Now, I find that the excess thread we started with kind of gets in the way so what I do is I take my needle off my working thread, thread the tail and then weave the thread back through the ladder stitch

it just tucks it away so we can continue with the fringe.
continue on with this technique until you reach the end of the earring.

Almost there!
You have some excess thread. To hide these threads, you are going to weave them back through the ladder stitch starting with the needle that is already threaded. Just work back through the ladder stitch, and go about three beads back.


on your last bead going downwards you'll continue on through the fringe below and pop out about halfway through.

pull all the way through and repeat with the other excess thread.
cutting your threads is tricky, you want to cut as close to the beadwork as possible but you want to move the other fringe away from it as to not accidentally cut the fringes.
when you cut close to the beads, pull slightly on the thread when you cut as this will create a bit of tension and stretch the thread a bit so that when you cut, the thread will pop back into the fringe and will not be visible.

Repeat steps with the other earring! Slide your kidney earring hooks into the hook hole, and you are DONE!!